How To Create Your Own Amazon Promotions in Seller Central

Discounts and promotions are not only a powerful advertising tool, but they also allow Amazon sellers to gain awareness and increase sales directly to their products during Q4, when shoppers are likely to make a purchase.
Customers want to save, and promotions provide an incentive to make a buying purchase sooner rather than later.
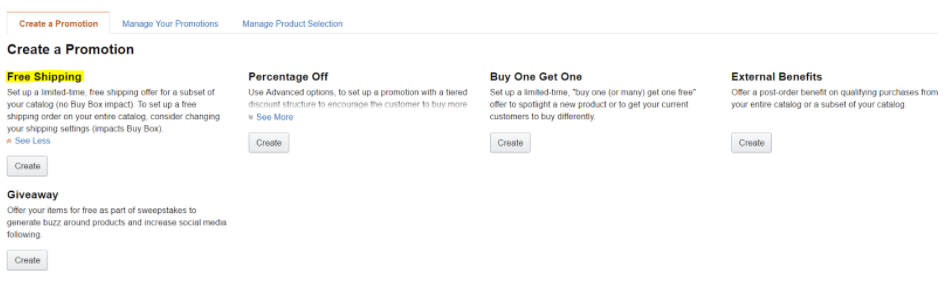
There’s a lot of promotions that you can run as a Third Party Seller on Amazon and in the following blog post, we will deep dive into each of the Amazon promotions available through Seller Central including:
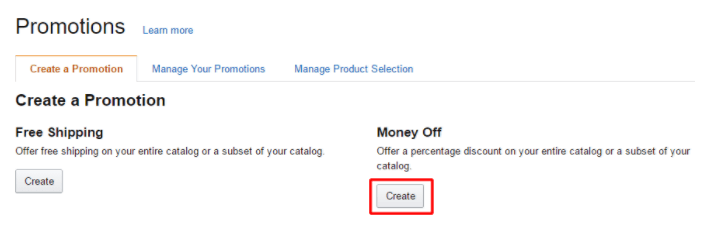
Money Off – Offer a percentage discount on your entire catalog or a subset of it.
Free Shipping – Offer free shipping on your entire catalog or a subset of your catalog.
Buy One, Get One – Offer one or more items for free on a qualifying purchase from your entire catalog or a subset of your catalog.
We’ll start with the Money Off promotion, which is the kind you’ll see most frequently on the Marketplace. The first step is to create a new product selection.
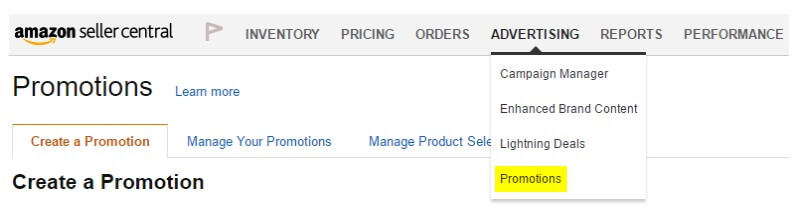
To do this, first navigate to “Advertising → Promotions” then click “Manage Product Selection” at the top of the menu.
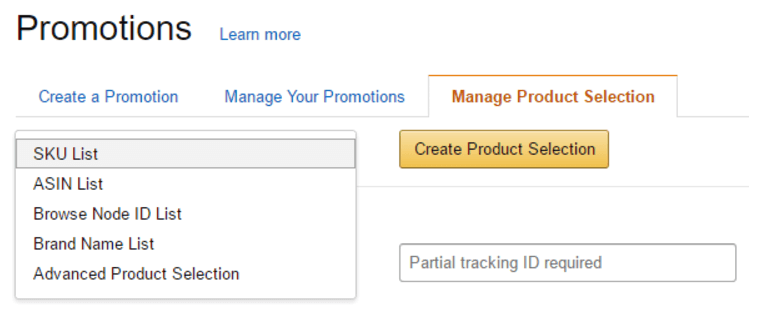
From here, at the top of the page, select the drop-down menu and choose “ASIN List” (or SKU list or another means of identifying each item) and click “Create Product Selection”.
Give the product selection a name, internal description, and add all the ASINs or SKUs that you want to be a part of the selection.
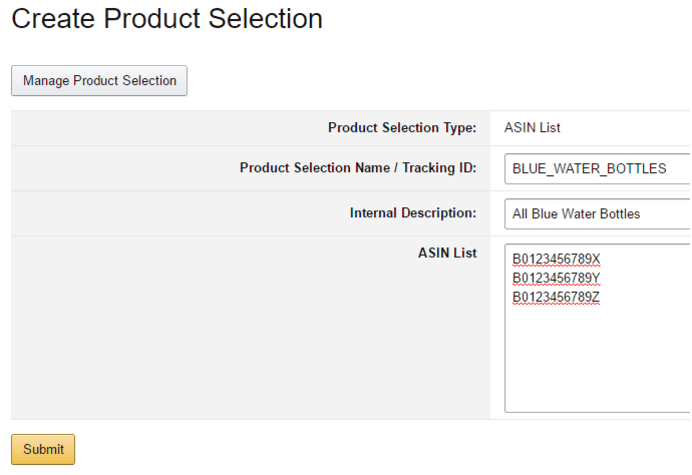
For example, add all the ASINs in your catalog that are water bottles for the water bottle product selection group, this way, you can offer a discount on all water bottles.
After you’ve created a product selection, it’s time to create the promotion. First, navigate back to “Advertising → Promotions” then click “Create” under “Money Off”.
There’s a lot of options here, so we’ll break them out into steps.
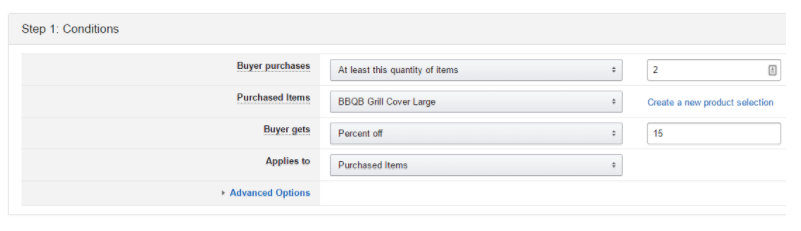
Step 1: Conditions
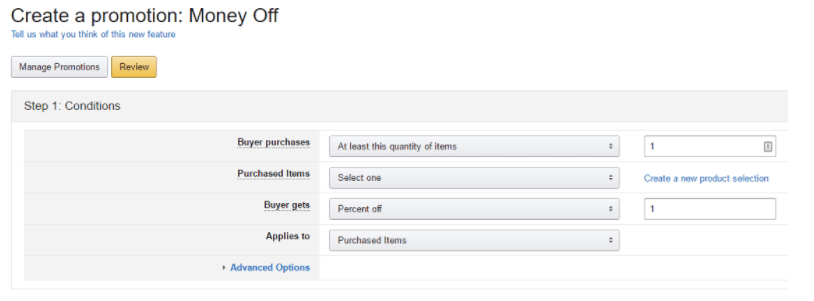
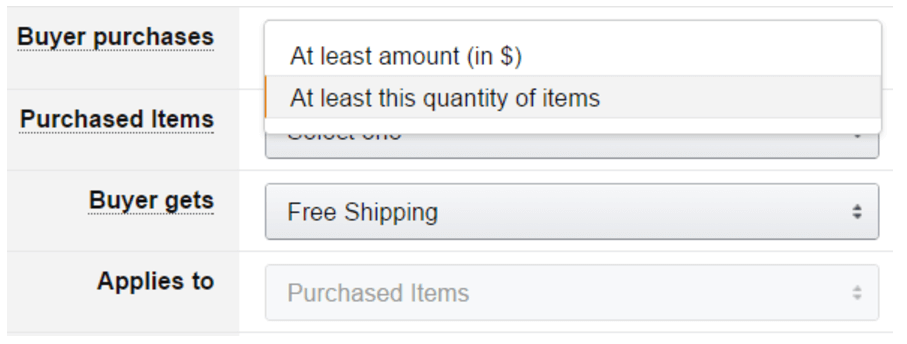
This is the area in which you will set the criteria that customers must meet to be allowed access to the promotion. The first selection is “Buyer Purchases:” you can choose from a drop down and select from the following options:
Buyer Purchases:
The next selection is “Purchased Items” this is where you’ll use the drop-down box to choose the product selection you created earlier.
The next field is “Buyer Gets”. This field is where you set the discount you want to give. Amazon only allows you to discount based on percentages, not actual dollar amounts.
The next field is “Applies to” this field should be left as the default, which is “Purchased Items”.
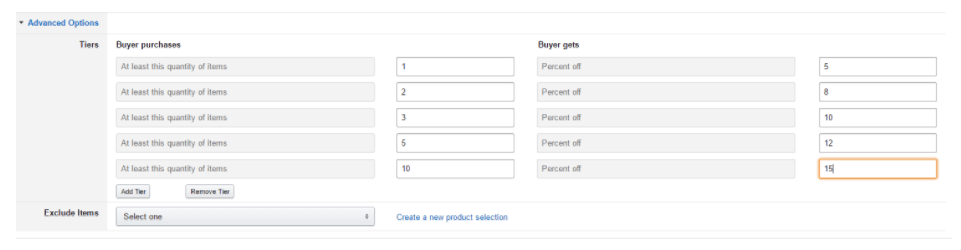
Pro-tip: Use the Advanced Options in Step 1 to set tiered discounts, allowing you to offer customers a diminishing discount the more they purchase. For example:
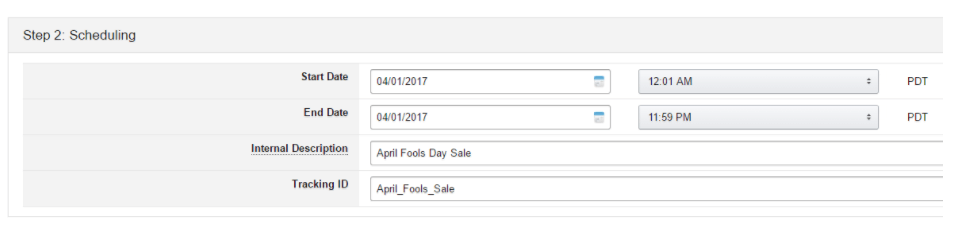
Step 2: Scheduling
This step is very simple. This is where you can set a start and end date for the promotion, dictating how long it will run for. Note that you must allow 4 hours into the future before any promotion can be started. If you attempt to start a promotion within 4 hours of the time you submit it, it will be denied.
You must also set an “Internal Description” which is how you will track this promotion in various business reports.
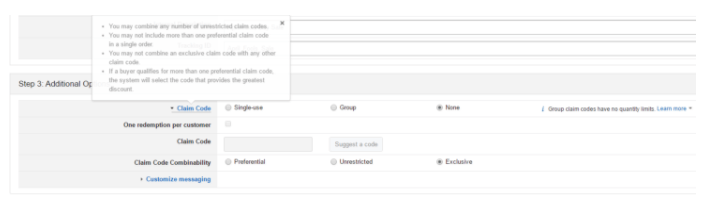
Step 3: Additional Options
This step is crucial, and these steps should be followed exactly to ensure that your promotion doesn’t accidentally give away lots of inventory at a discount.
If you to require customers to entire a code at checkout to receive the promotion (i.e. enter code SAVE15 at checkout to save 15%) then you’ll need to click on “Claim Code” to expand the menu. If you want the promotion to be automatically applied to qualifying orders, you can skip ahead to part 3.
Part 1: Creating a Claim Code
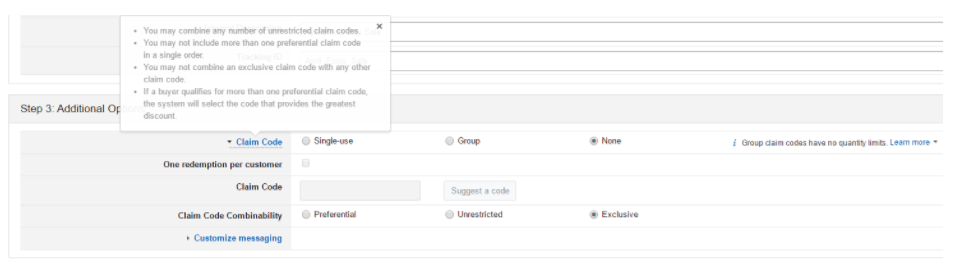
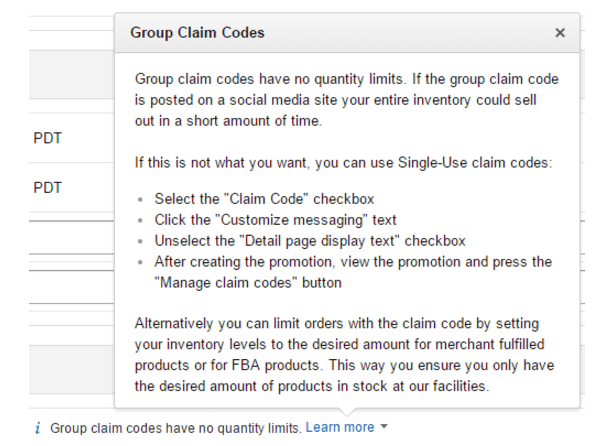
There are three options for creating a claim code. You can choose:
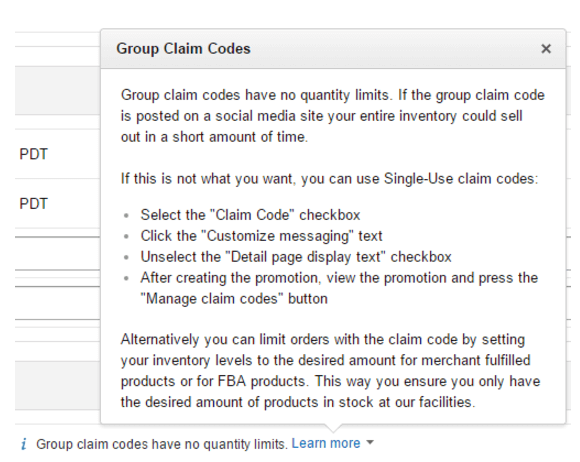
Consider the type of promotion you’ll be running. If you’re giving a large discount, or announcing the discount to a large group of people (i.e. deals website, social media post) you should choose “Single-Use” to avoid people abusing the discounts you’re offering.
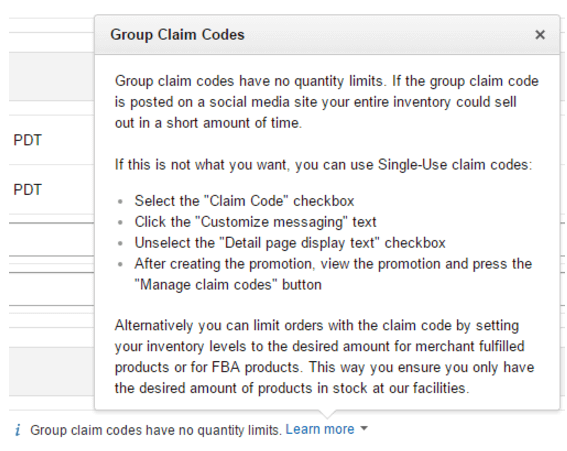
If your promotion is a small discount, or a discount only given with multiple quantity orders (i.e. buy 3 save 15%), or if you plan to offer this promotion to anyone/everyone for a long period of time, “Group” claim codes might be a good choice for you.
Part 2: Claim Code Combinability

There are three options for Claim Code Combinability:
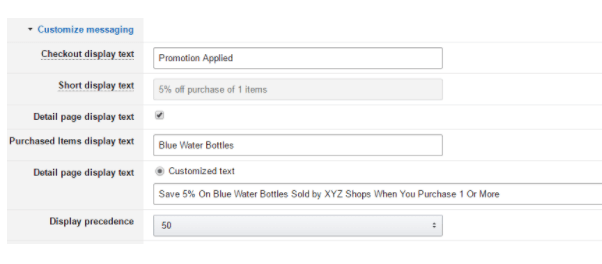
Part 3: Customize Messaging:
The final step for creating this type of promotion is deciding whether you want the promotion to be displayed on the detail page.
Step 1: Detail Page Display Text?
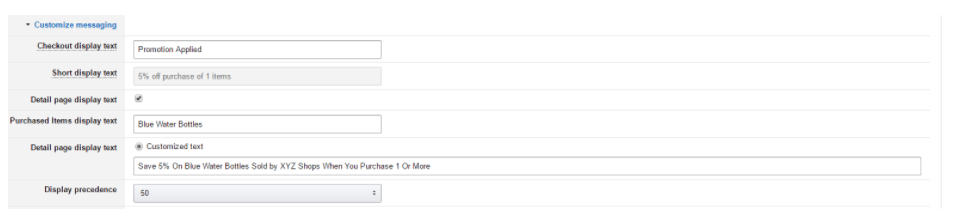
If you want the promotion to be displayed on your detail page, ensure the box titled “Detail page display text” is checked. You can then edit the following fields to customized the text that is shown to customers:
And that’s all! Click “Review” and ensure everything is correct before submitting the promotion. Once you’ve clicked submit you’re ready to go, and should see your promotion live at the time you set!
This promotion does exactly what you’d think, allowing you to offer Free Shipping for all or part of your catalog (Note: These settings will have no effect on your chance to win the Buy Box). Also, note that this promotion will apply only to FBM offers.
Step 1: Conditions
This is where you’ll set the criteria each buyer must meet before becoming eligible for the promotion. The first selection is “Buyer Purchases:” you can choose from a drop down and select from the following options:
Buyer Purchases:
The next selection is “Purchased Items” where you’ll use the drop-down box to choose the product selection you created earlier.
The next field is “Buyer Gets”. This field is limited to include ‘Free Shipping’ only and may not be changed. For more options on ‘Buyer Gets’ see ‘Money Back Promotion’.
The next field is “Applies to” this field should be left as the default, which is “Purchased Items”.
The last box called “Qualifying Shipping Options” indicates which shipping methods you’re offering to the customer for free. Amazon will display all available shipping methods you offer based on the Shipping Template you have created in Seller Central. If a setting is selected, it will be made available to the customer for free at the time of purchase, however it will not effecting your position in the Buy Box auction.
P.S: “Advanced Options” enables the ability to exclude certain items from the promotion. It will usually be easier to exclude unwanted items in the first step, creating a new product selection, but you may accomplish the same task here.

Step 2: Scheduling
This part is the easiest step in creating a new Free Shipping promotion. Simply set your start Date and End Date (note: start date must be at least 4 hours in the future). You must also create an Internal Description and Tracking ID to move onto the next stage.

Step 3: Additional Options
Step three may seem simple on first glance, but it’s important to know what each of these settings means before continuing to ensure your discount is only provided as you wanted.
Part 1: Creating a Claim Code

There are three options for creating a claim code. You can choose:
Consider the type of promotion you’ll be running. If you’re announcing the discount to a large group of people (i.e. deals website, social media post) you should choose “Single-Use” to avoid people abusing the discounts you’re offering. Or, if you want to offer your email subscribers Free Shipping on their next order, you could create a Group Code like “FREESHIP” and sent it to all your followers.
Part 2: Claim Code Combinability

There are three options for Claim Code Combinability:
Part 3: Customize Messaging:
The final step for creating this type of promotion is deciding whether you want the promotion to be displayed on the detail page.
Step 1: Detail Page Display Text?
If you want the promotion to be displayed on your detail page, ensure the box titled “Detail page display text” is checked.
You can then edit the following fields to customize the text that is shown to customers:
And that’s all! Click “Review” and ensure everything is correct before submitting the promotion. Once you’ve clicked submit you’re ready to go, and should see your Free Shipping live at the time you set!
This type of promotion is used to offer a customer 1 or more items for free after each other item they purchase. Learn what all the fields mean, and how to set everything up by reading below.
Step 1: Conditions
This is where you’ll set the criteria each buyer must meet before becoming eligible for the promotion. The first selection is “Buyer Purchases:” you can choose from a drop down and select from the following options:
Buyer Purchases:

The next selection is “Purchased Items” where you’ll use the drop-down box to choose the product selection you created earlier.
The next field is “Buyer Gets”. This field is limited to include ‘Free items’ only and may not be changed. For more options on ‘Buyer Gets’ see ‘Money Back Promotion’..
The next field is “Applies to” this field should be left as the default, which is “Purchased Items”.

Next is where you’ll determine how many free units the customer receives for each purchase. In the example above, the customer will receive 1 free item for every 1 item they purchase.
Step 2: Scheduling
This part is the easiest step in creating a new Buy One Get One promotion. Simply set your start Date and End Date (note: start date must be at least 4 hours in the future). You must also create an Internal Description and Tracking ID to move onto the next stage.

Step 3: Additional Options
This final step is one of the most critical to ensure that you don’t make any mistakes to the promotion eligibility.
Part 1: Creating a Claim Code
There are three options for creating a claim code. You can choose:
Consider the type of promotion you’ll be running. If you’re announcing the discount to a large group of people (i.e. deals website, social media post) you should choose “Single-Use” to avoid people abusing the discounts you’re offering. Or, if you want to offer your email subscribers Free Shipping on their next order, you could create a Group Code like “FREESHIP” and sent it to all your followers.
Part 2: Claim Code Combinability

There are three options for Claim Code Combinability:
Part 3: Customize Messaging:
The final step for creating this type of promotion is deciding whether you want the promotion to be displayed on the detail page.
Step 1: Detail Page Display Text?

If you want the promotion to be displayed on your detail page, ensure the box titled “Detail page display text” is checked. You can then edit the following fields to customize the text that is shown to customers:
And that’s all! Click “Review” and ensure everything is correct before submitting the promotion. Once you’ve clicked submit you’re ready to go, and should see your Free Shipping live at the time you set!